
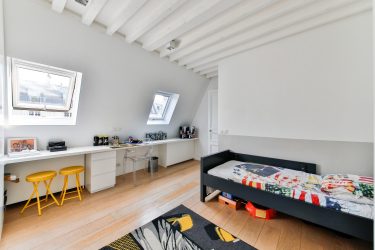
So, you have finally decided to turn that unused room in your home into a stylish play area for your little ones. There are a few DIY projects that you can complete on a budget to turn the area into a fun and inviting space for your kids.

Install Durable Flooring
It is extremely important to create a play space that is durable. Installing carpet tiles as bedroom floor surface will protect your kids from falls during rough play. Not only will carpet tiles add more cushion to the room, but they work as excellent sound barriers and they are extremely durable. Without a doubt, this space will see its fair share of spills. If you have wall-to-wall carpet that is met by a fresh cup of grape juice, you will have to remove the entire floor cover in order to make it look clean and fresh.
With floor tiles, you can simply lift out the soiled area and place a new square in. Additionally, floor tiles can be mixed and matched, creating a playful blend of colors and shapes. There are even floor tiles designed as hop-scotch boards, so your kids can make use of the floor in a fun and entertaining way.
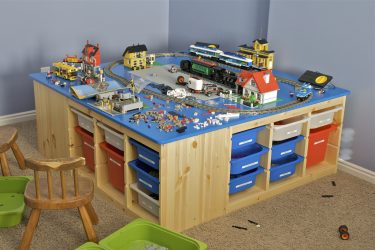
Recycle an Old Table into a Play Surface
Whether you have an old dining, coffee, or end table, you can recycle your unused item into a new play surface for your little ones. Thrift stores are an excellent source for finding vintage furniture that is extremely affordable. Browse your local second-hand store to find the perfect table for your space.
If you have a dining table, cut 6-inches off each leg height to make it more suitable for small chairs. Next, paint the legs and table a fun and inviting color or an array of bright colors. Once the paint dries, use a construction adhesive to glue flat lego boards to the top of the table. You can choose sections that are all the same color, or mix it up for more fun. Use a few recycled baskets to store legos when your kids are done playing. You can use crates or toy chairs to provide seating for your child around their new play table.
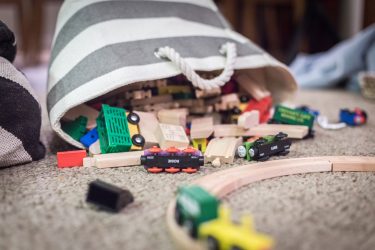
Storage Solutions
Create the perfect storage system using old recycled pallets. Remove the backboards from the pallet, leaving only the top, middle, and bottom sections and sand each of the remaining surfaces. Apply your favorite color of paint or stain to the wood and allow it to dry. Place the pallet flat against the wall, allowing the backside to rest flush against the wall.
Screw the top, middle, and bottom sections to the wall to ensure a strong hold. Have your little one insert their shoes between the slats, or use the handles of baskets to hang between the boards for a storage-basket solution. Additionally, attach some hooks along the top board to hang hooked toys and other items.
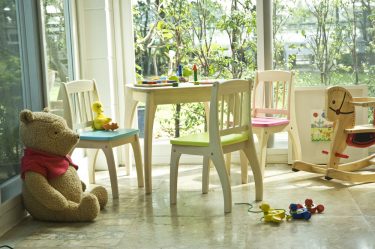
Create a Seating Area
Repurpose an old sofa or ottoman to create a family friendly seating area in the playroom. Comfortable seating does not have to be expensive. You can create a frugal seating area that is charming and inviting by repurposing a vintage sofa with strong and durable fabric. Carefully remove the existing fabric section-by-section and lay it on top of your new fabric. Use a fabric pen to create an outline of each section and carefully cut it out with strong fabric scissors.
You may be able to reuse the existing stuffing, but if it is flat you will want to add new foam stuffing for added comfort. Sew the sections back together and cover the interior frame. You will need a staple gun to attach the fabric along the bottom of the furniture once the entire piece is recovered.
Bear in mind that if this is your first DIY project, or if you are unsure of your own capabilities to perform certain home improvement tasks, it is best to seek the help of a professional, as it ensures personal safety. If you decide to go the DIY way, you should be prepared to adopt all the necessary precautions and safety measures. Also, make sure that you have the right tools for the job. This goes for all the projects we list here.
Create an Art Area
Young children like to get in touch with their creative side. Designing a spot in your playroom will ensure your child doesn’t write on the walls of your home. Instead, frame out a small area of your wall using an old window casing. Check out your local thrift store to see if they have any old windows available for sale. Break out the glass over a garbage pail and fill in the glass inserts along the edge with wood putty. Once the putty is dry, gently sand around the entire frame and paint it your favorite color.
Locate a spot in the playroom, and secure the frame to the wall using screws. Paint the wall located within the frame using chalkboard paint. This will create an area on the wall your little one can use colored chalks to design their own wall art. Another crafty DIY idea involves using an old towel rod. Have your child sit on a chair facing the wall in the desired location. Mark the wall around 12-inches above your child’s sitting eye-level. Mount the towel rod at this location. Measure down 3-feet from the mounted rod, and attach a second rod running parallel to the first one. Hook on baskets to the bottom rod to store pencils, crayons, markers, or paints. Slide a roll of paper onto the top rod, and roll some paper down toward the bottom rod.
This creates a child-proof drawing aisle your child can use to create their precious works of art. Once a drawing is complete, you can simply tear away the paper and roll down more for their next masterpiece.
Final Thoughts
All of these projects can be incorporated into a play area for your child to create an inviting space the whole family will love. Whether you decide to incorporate the fun play table, a stylish art aisle, or a seating area for reading and relaxing, each of these projects can be completed inexpensively to transform your space. It is crucial for you to attach large storage shelves and racks to the wall securely in order to create a safe space for your child to play. Don’t forget to hang your little one’s drawings on the wall, using string and clothes pins, for everyone to see!
Like what you read? Check out our last “How To” article here! Also check out our latest FREE online classes, parenting advice, jobs for moms, events, childcare listings, casting calls & raffles, and our Parents With Nannies Facebook group.
Jeff E. Brown, freelance writer

Jeff E. Brown is a freelance writer, self-taught lifehacking teacher, DIY home improvement specialist, owner of two happy dogs and a barbeque master. He loves learning through experience and writing about all the cool things he has learned since he moved out of a compact apartment into a comfortable house. You can reach him @jeff8rown
The views and opinions expressed on this blog are purely the blog contributor’s. Any product claim, statistic, quote or other representation about a product or service should be verified with the manufacturer or provider. Writers may have conflicts of interest, and their opinions are their own.